Summary
Uploading a custom world to a Minecraft server can provide players with a pre-built environment to explore, build in, and interact. It is a great way to share Minecraft creations and collaborate with other players to create even more elaborate structures and landscapes. Uploading a custom world to a Minecraft server can build a community of players with similar interests who enjoy playing the game together.
| Requirement |
| An FTP client is required to transfer files over 500mb onto the Minecraft server. Follow this tutorial to learn how to use an FTP client. |
| Note | World save location will vary depending on the type of launcher used. For the official launcher, saves can be found in %appdata%\.minecraft\saves\ . |
How to Upload a Custom World to a Minecraft Server
1. Right-click the world folder, then choose Send to > Compressed (zipped) folder. 
2. Minimize the file to use later in the tutorial.
3. Log in to the BisectHosting Games panel.
4. Stop the server.![]()
5. Go to the Files tab.![]()
6. Drag and drop the .zip file from step 2.

7. Right-click on the .zip file and choose Unarchive.
8. Go to Config Files > Server Properties from the left sidebar.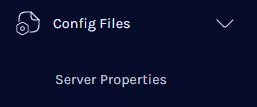
9. Navigate to the Level Name section and Change the name to the uploaded world folder.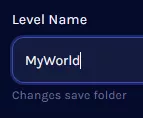
10. Start the server.![]()